Not too long ago, Microsoft's Bill Gates did make the statement that
640k memory should be enough for everyone.
However, this is not the case nowadays as newer and latest applications require more ram to load up all the features. 1 or 2 gigabytes [ 1000mb ] of ram is no longer considered exorbitant. In fact, in today's standard, 1 gigabyte is considered entry level.
However, even with the large extensive memory available to an operating system within a PC today, it may still be insufficient as today's operating system are multi-tasking more than 20-30 applications and services all at the same time. Dual core processors require even more ram as they process twice as fast and access more parts of the memory.
As applications and services use and fill out the available physical memory, the operating system cannot merely let it run out of memory. Thus one way to prevent out of memory errors is to use physical storage space such as the HDD as a form of virtual RAM or virtual memory.
In Windows, this is also known as the
Page File.
The Windows Page File is usually created automatically by default and its size is usually 1.5 times the available physical memory. [ ie a PC with 1 gigabyte RAM will have a 1.5 gigabyte paging file ]
MICROSOFT Help & Support : How to clear Windows Paging File at Shutdown
Although it is possible to have a RAM capacity large enough to handle all the current processes [ assuming you installed 4 - 8 gigabytes of RAM ] to make paging redundant, this is not recommended in Windows as some applications still make reference to the paging file used.
In this case, it is best to make the paging file the minimum size so as to make use of the fast physical RAM speed and to reduce paging read/writes to the HDD.
In XP or Vista, this paging file is usually named as "pagefile.sys"
To set the size it uses, rather than letting the system setting the size automatically, right click on "My Computer", click "Properties", select the "Advanced" tab, then click "Settings" in the "Performance" section. After that, click the "Advanced" tab and click on "Change" under the "Virtual Memory" section.
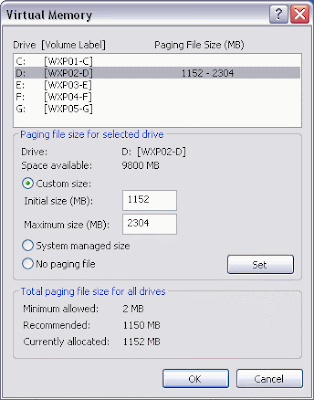
Windows sets this to 1.5x of your physical RAM as Virtual Memory, but this only holds true if the physical RAM is less than 1 gigabyte. If you have 1 gigabyte of RAM or more, it is recommended to consider changing the size. A great guide can be found here by
The Elder Geek.It is also recommended for better HDD speeds to have the paging file to be located on a different physical HDD from where the operating system is currently installed. [ie if XP or Vista is installed on C:, place the paging file on D:] This applies if you have more than 1 physical HDD. A single HDD partitioned into 2 drives will not help much.
This is because by having the paging file on another physical HDD, the reading and writing of data/applications on the operating system and the reading and writing of page file exists on different HDD rather than doing both on the same HDD.
Another guide here on how to optimize your page file for performance
Optimizing Your Server's Pagefile PerformanceWindows Task Manager gives a detailed view of how the memory is being handled and it can be used to find out if the staticly assigned page file is good enough for the system. Techrepublic has a easy to read guide on
how to use the Windows Task Manager for this purpose.
As the pagefile is a file that is constantly being read and written to, there may be instances of corrupted sectors during a bad write to a sector. To reduce paging faults due to bad data, it is recommended to delete it and let Windows recreate it after some time. The pagefile.sys should not be deleted via Windows File Explorer but using this method instead.
MICROSOFT Help & Support : How to clear Windows Paging File at ShutdownThis will set the pagefile to always delete itself after every reboot. To revert, simply put a "0" value instead of a "1" value as described in the above link. Deleting the pagefile.sys at every reboot will introduce a small delay during the reboot/shutdown process. You might only want to do it for 2 reboots/shutdowns and revert to normal after that.
Today is 5th April 2009
Time now is 22:01 hrs


