MSN messenger, Winzip, Nero, PowerDVD, Firefox, Chrome, Java runtime, anti-virus programs, etc.
You'd probably also customize the appearance of the desktop such as the start up menu color, background picture and even a sound scheme that features your own voice....
Only after fully customizing it, you'd feel the PC is ready for use.
Then the fear of losing the 2-3 days of customization work sinks in.
What if the PC is infected with some serious spyware and virus and you have to reinstall everything all over again?
Sure, there's a recovery partition but that only recovers to a fresh OS without any customization, there'd be 3 more days of work before the PC was at its peak, before all the other files started to clutter all over.
So what can be done to ensure that this customization stays?
ie.. recover to a operating system that is already customized?
There are various ways to do this.
1) Norton Ghost [ commercially available ]
2) Microsoft backup and recovery
3) Linux Live CDs
Here we will elaborate on method 3.
Method 1 is a paid software.
Method 2 is included in M$ operating system [ never tried ].
Method 3 will include using open source operating systems to back up XP or Vista operating systems without actually booting into XP or Vista.
Firstly, we'd need to download and burn a LiveCD.
Secondly, an empty USB HDD with the size larger or equivalent to the partition that the XP or Vista was initially installed.
[ eg if the desktop HDD is 160 gigabytes in size, buy a USB HDD of 160gigabytes or larger ]
For making a LiveCD, Ubuntu is preferred. Once the ISO is downloaded, burn it into a CD
[ Step by step guide here ]
Reboot the system and boot via the LiveCD now loaded into the cdrom drive.
Once the Graphical User Interface appears, the LiveCD is considered running the Ubuntu Linux operating system on your PC.
Reboot the system and boot via the LiveCD now loaded into the cdrom drive.
Once the Graphical User Interface appears, the LiveCD is considered running the Ubuntu Linux operating system on your PC.
Once the LiveD boots up, plug in the USB HDD.
At this point, it's assumed that the partition containing the XP or Vista is already installed within the PC's IDE or SATA connection.
Once the USB HDD is plugged into the PC, an icon should appear on the Desktop background. Double click on the icon of the USB HDD and enter the drive to make sure its completely empty. Once it is confirmed an empty drive, close the folder by clicking on the "X" at the top right corner [ similar to XP/Vista function ].
Next, right click on the USB HDD icon again and select "unmount"
The reason why we need to unmount the drive is because the drive cannot be mounted if it's partition table is to be modified. Disconnect the USB HDD at this point.
Now, Partition Editor needs to be started. Make sure the USB HDD has been dismounted at this point.
On the top menu, select "System" -> "Administration" -> "Partition Editor".
 Partition editor should now run.
Once Partition Editor finished reading the available partitions, the first HDD partition tables shown, will usually be the primary internal IDE/SATA hard disk, ie the customized XP/Vista hard drive.
For PCs from the major vendors, there should be a small partition which consists of the recovery partition. This recovery partition is used to recover XP/Vista to factory defaults. This will not be backed up for this example.

This is the typical XP harddisk with 1 single partition
There will be another larger partition block shown, which will most likely be the partition of your heavily customized XP/Vista system, and this will be the one that needs to be cloned.
[ Take note that the filesystem of the XP/Vista will usually be NTFS ]
Harddisks are classified by Linux in the notation /dev/sda , /dev/sdb, /dev/sdc and so on. From the drop down list in the image below, you should see the harddisk sizes.
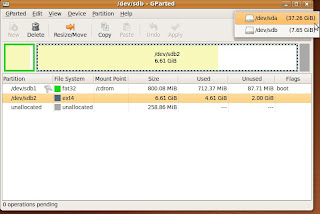

Drop down list showing all physical HDD attached
Next the USB HDD's partition table needs to be emptied.
From the drop down list shown in the image above, there should be a second HDD that can be selected in Partition Editor. Click on the second one on the list and the partition table of the USB HDD should be shown.
Most USB HDD are pre-formatted for FAT32 filesystem. It should be a single block of partition shown if its a newly bought HDD, else if it was used for some other purposes before, it may show more than 1 partition block, in this case, all the existing partitions needs to be deleted.
To delete the existing partition(s), select them, right click and click on "Delete". After that, it's necessary to click on the apply button to execute the series of commands to finalize the deletion of partitions. All partition blocks on the USB HDD must be deleted at this point.


Right click on the partition blocks on the USB HDD to delete them
It is absolutely necessary to be sure of the partitions you are deleting belongs to the USB HDD and "not" the partitions of the XP/Vista HDD.
To really be sure that you are deleting the correct partition of the USB HDD, one can use size as the indicator if the USB HDD and the Windows XP HDD are of different sizes, else disconnect the USB HDD drive, do a refresh of devices and note down which are the drives present [ eg /dev/sda, /dev/sdb, etc ]. Now plug in the USB HDD and refresh devices again, this time take note of the new device name in the drop down list on the top right [ eg /dev/sdc ], this is the device identification for the USB HDD.

Now the last part is the simplest.... Cut and paste the larger partition block(where the current XP operating system is installed on) of the XP HDD into the USB HDD. And finally click on the Apply button [Tick icon]. Make some tea and await for it to complete.
Now that you have a clone of the partition of your freshly baked XP system, in the event when you do need to restore to what it was, just reverse the steps and copy the partitions over from the USB HDD to the XP HDD.
Now that you have a clone of the partition of your freshly baked XP system, in the event when you do need to restore to what it was, just reverse the steps and copy the partitions over from the USB HDD to the XP HDD.
Today is 12th November 2009
Time now is 13:05 hrs
No comments:
Post a Comment